RC CAR FROM SCRATCH
As mentioned on the About Me page, I'm an avid automotive enthusiast. As such, I spent my rather laborious commutes to and from work listening to a podcast hosted by my favorite automotive journalist and personal hero, Chris Harris. During one of these commutes, I listened to an episode featuring Gordon Murray, another one of my heroes. As Gordon recounted his legendary career as an automotive engineer, I couldn't help but feel inspired to direct my passion and creativity into an automotive engineering project of my own.
With careful consideration, I decided that the most appropriate way to appeal to my passion for design and automobiles would be to create an RC car using as many custom built components as possible. After a couple hours of sketching and brainstorming, I produced the following preliminary sketches:


Once I understood the general design I wished to pursue, I purchased a 3D printer, as this was the most efficient means of producing detailed components at a price point that allowed for frequent iteration. As I awaited the arrival of the printer, I began work on designing the steering system during my spare time after work. I had no idea how intricate of a component the printer would produce, and as such designed a simple rack, pinion, steering knuckle and wheel. This original version of the steering system is shown alongside my 3D printer below:

After assembling the printer, I began to experiment with its myriad settings and eventually managed to print the included test part shown on the right. Having been impressed with the printer's precision and speed, I decided to print another file: a piston and connecting rod assembly I designed last summer. Satisfied with my choice of settings, I was ready to begin bringing my project to reality.


These are the parts from the Solidworks assembly shown above. Just as before, I was blown away by the quality. However, the primary constraint of my project is the print quality of my parts. As such, I knew I had to take advantage of these newly discovered capabilities by returning to the drawing board.
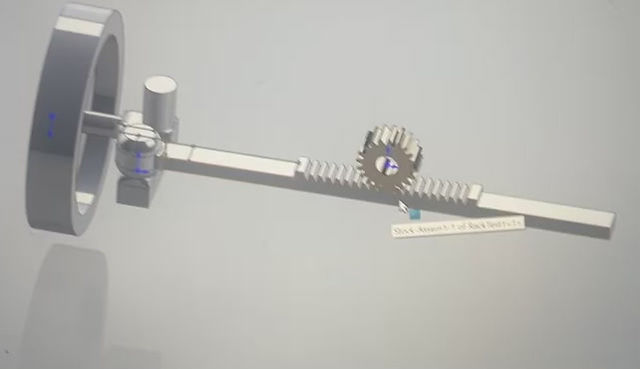
At this stage, I decided to greatly strengthen the rack and pinion and added guide rails to the rack to improve stability. During this process, I purchased a stepper motor and a set of digital calipers in order to properly tolerance my new pinion gear. Finally, I printed a new steering knuckle and joints with improved tolerances.

Being fairly confident in these new components, I decided to move on to designing the steering (front) wheels. Due do the "from scratch" nature of this project and my lack of machining equipment, I opted for a fully 3D printed wheel. This meant creating a set of planetary gears that acted as a wheel. The sun gear would connect directly to the steering knuckle, the ring gear would act as a tire, and the planet gears would act as bearings.
In order to assure proper functionality of the wheel, I contacted a friend with access to state-of-the-art 3D printing technology. My goal was to create the wheel using "print in place" technology, in which multiple meshed gears can be printed at once. However, these very expensive printers were unable to print the part properly. This meant I had to re-tolerance the parts and print them on my home printer. This process has proven very difficult, as parts printed from my printer require significant post-processing. Post-processing these delicate components frequently resulted in catastrophic failure. In the future, I plan on rectifying these issues by printing larger gears, and, by extension, a larger wheel.


$40,000 3D-Printer
$300 3D-Printer
In the meantime, I purchased the following electronics:
1. Two 12V 100RPM DC Motors
2. Arduino Uno and Arduino Nano
3. Rechargeable AA Batteries and Charger
4. Series AA Battery Cases (3, 6, and 12 Volt)
5. Stepper Motor Drivers
6. 12V Motor Drivers
7. Arduino Jumper Leads
8. Breadboards
9. Linear Potentiometers
10. Rotary Encoders
11. Radio Transceivers

Having obtained all necessary electronics, I wired up the Arduino Uno with the stepper motor, its driver, the 12V motor driver and 12V battery case and performed tests to determine how quickly the car would be able to steer. Further, I was able to read rotary encoder values in a manner that could be broadcast to the controller.

There is a lot to add here... Feel free to contact me if you'd like an update on the status of the project!